Showing posts with label sewing. Show all posts

Sunday, February 23, 2014

Staple Bandwagon

Some decided sewing time on my birthday a few weeks ago finally meant I got to finish a few projects for me!  So I thought I'd join the bandwagon and make that Staple Dress by April Rhodes people keep bloggin about.


Simple, cute, can use most fabrics for it = win for me.  I hoped I could make it my go to pattern for quick dresses, because well, I love dresses and have limited sewing time.


I purposely just made the XS, hoping it would fit well enough and I would alter any future versions.  With the elastic shirring waist, I figured it would fit ok regardless.   I'm not however a fan of high necks for a few reasons, mainly because I'm still nursing little E.  So I did grade down the neck a good bit, and out a teeny bit.


I was also sewing with a quilting weight cotton, not ideal (but super cute!), but again, I figured I'd try it.  I also wanted to try the drop hem.  Drop hem + this weight of fabric = not the best, but again, ok!


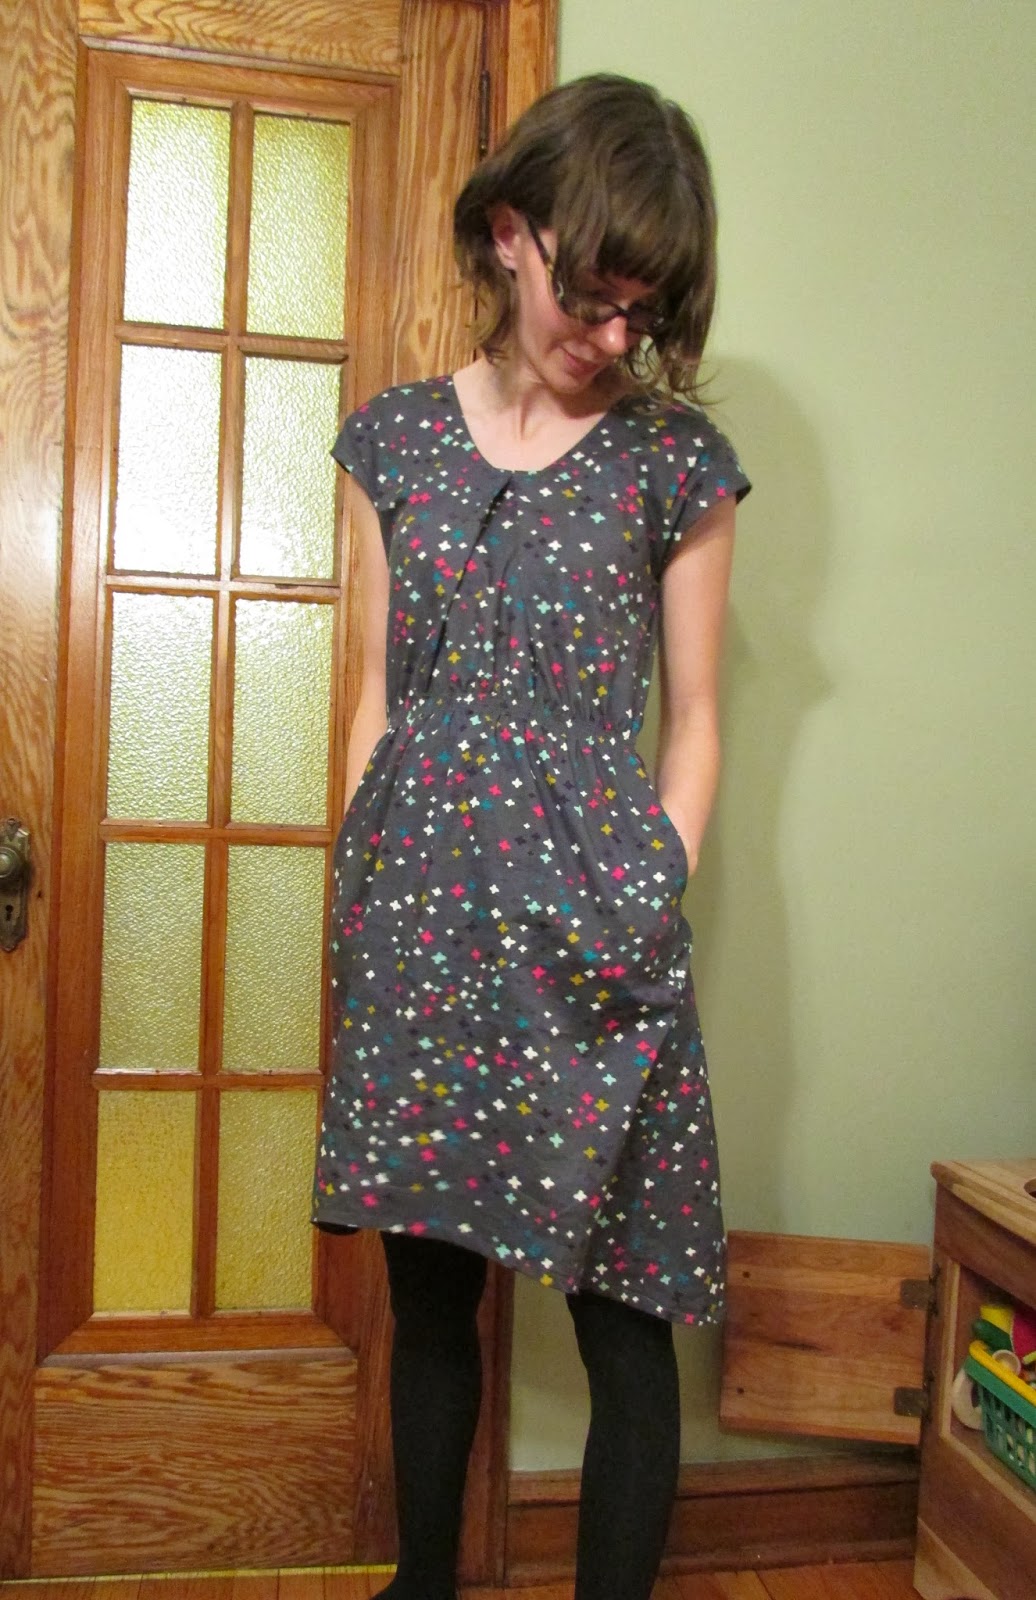
So results?  Definitely quick, easy and cute, but the XS is still way too big on me, with gaping across the bodice under the arms.  Sure its a relaxed fit, but not this much.


Solution?  Added a inverted box pleat to the neck line at the front and a little one at the back.  Sure this meant my neckline doesn't allow for nursing, but it brought everything together.  I could have taken in and redrafted the sides, but this was a quicker fix for this one.


Next time?  I need to take a inch at least out of the centre on the fold, THEN with an adjusted neck?  It should equal awesome.  Knit version next time maybe?


Wednesday, January 1, 2014

2013 - A Short Review

Sure I didn't sew or blog as much as I wanted in 2013 (I'm blaming getting used to having two kids and trying to sell a house!), but I'm still happy with what I made!

So heres a little recap.


And here are a few things that I made by haven't blogged (and might not blog) yet.


I also started making these scarves from woven wraps to sell just last month.  I've sold a number, and we'll see how it goes, I do love them! (more details on my Facebook page HERE.)


What in store for 2014?  I'll keep it simple.

- Sew mostly from my stash.  I managed to acquire a LOT of new patterns and fabrics this year (probably because I have easy access to all the lovely stuff at Fabrications!)  So I plan to sew mostly from that this year!
- Learn to draft patterns.  I'm taking a course on drafting a skirt at Fabrications next week so hopefully that will go well!
- Organize and finish setting up my sewing room, I moved and started this in the summer, and when it's done it will be awesome!  I also plan to better organize my fabrics/patterns/projects (in an app or database)  I so easily loose track of what fabric I have and what I plan to do with it!

How was your 2013?  And whats planned for 2014?

Tuesday, December 24, 2013

A Ruby Christmas

Since I don't have girls to make Christmas dresses for, I figured, I could make one for myself right?

I bought some of this fabric at my local chain store because I LOVED the Rudolph cartoon as a kid, and my son loves it now too.  I figured I'd make like a pillow or something, so I just got a meter of it.


But then I thought, maybe I could make a dress!  I thought a bit, and wondered if maybe Made by Rae's new Ruby dress might fit the bill as it didn't need much of the main fabric.  Sure it calls for more than a meter, but with some careful cutting (it's the Dutch part of me) and since I only needed to cut an XS, it was JUST enough.

(Please excuse my crazy hair ;)

I paired it with some blue cotton and bingo.  Only one problem remained, this dress is NOT accessible for my eager nursing babe.  So I thought, can I just add a button placket.  Not too hard, just cut the front bodice in half at the centre and lengthened each side a few inches so I could make a placket.  I still finished it with bias tape (although the wider stuff was all I had on hand)  It's not perfect by any means, but as Christmas dress that won't get worn very often, it was ok.


The final issue was that the top bodice is NOT long enough to access the girls.  So I slit the skirt down 3 inches in the centre front, rolled a tiny hem and top stitched it.  With the gathers in front it isn't obvious, but gives a bit more room.  If I make this again (which I likely will as it's a quick sew even with the changes)  I'd go down another inch, add a proper facing (I just zig zagged around the bottom of the V, but it'll give out with repeated use.) and a small snap or so as it may gap if longer.


So now we're ready for Christmas! (please excuse me while I finish sewing three more gifts)

Oh and I'll share too that I made a couple lengths of Christmasy bunting this year too.  I wanted quick safe ornaments for our tree, and so I've hung the bunting there this year,  its a bit big, but ok, and in future years I can hang the bunting elsewhere!

MERRY CHRISTMAS AND HAPPY HOLIDAYS ALL!


Wednesday, December 11, 2013

Facebook and a new endeavour

So I've finally created a Facebook page for these here lil blog.  Sure there isn't many of you followers, but I thought why not!  Check it out here: http://www.facebook.com/oldhousemamawears

And plus, it seemed a good platform to hawk my new mini endeavour.  Making infinity scarves from woven wrap fabric, Didymos indios in particular.  After making one up from a scrap and getting such a positive response, and encouragement to make more from other mamas in my local babywearing group, I thought hey, why not try it!

This is the one I made for me from a hemp blend indio called Lila.


I have several other indios to chop up on the way, and one here already.  So you all should go check them and me out here  http://www.facebook.com/oldhousemamawears  sometime.


Tuesday, December 3, 2013

One Year Old in a Bimaa Hoodie

Hard to believe this sweet, sweet boy is already one!  It seems just like yesterday we snuggled into bed after his birth a chilly morning in December.


And today he's a bundle of silliness, just starting to form almost words, and just starting to stand on his own.

To help celebrate, I thought I'd make him something new, and made him up a Bimaa hoodie.  I got this pattern in a bundle a few months ago, and loved the slim fitting style and oversized hood.  And it delivered exactly what I wanted.


I made the 12 month size, and it fits exactly.  I plan to make more, but I'll definitely size up.


I wasn't 100% sure of the big hood, but it's the perfect oversized hood!  Look at it! it's too much cuteness!


And now he can sorta match his brother when he wears the cardigan I made him!  I need to get a picture of that at Christmas!


Thursday, November 21, 2013

A Spring Coat in the Fall

I admit it, I'm behind in writing posts.  I have been sewing, sure not as much as I'd like, but I have been.  But everything with two kids is kinda sporadic.  So I think I just need to embrace it, and post when I can!  I have a backlog of a few projects, and this is one of them.

A coat for baby E.


This is Anna Maria Horner's Baby in the Hood pattern from her Handmade Beginnings Book.  You may remember I made for for M 2 years back.  I love the hood and contrast fabric panels, so I thought I'd make up one for E's first spring and fall.


I made his back in April, and Little E did get some wear out of this little coat though in the spring, but lots more this fall as it fit him better.  I made the 9-12 months size, so he some room to grow when I made it for him at 5 months, but sadly he's now to big for it and well, it's about winter anyways!

These pictures are from back in September, and gosh he looks adorable eh?


I did make some changes when sewing this one up though.  One is obvious, I put a zipper in instead of toggle buttons.  I found it almost impossible to get toggles done up on a squiggly baby, and much prefer a zipper.  I didn't change the pattern at all for the zipper really, so it's a bit awkward as it's just attached to the outside edge of one button placket, and sewn into the inside edge of the placket on the other side.  Problem is the way the seam lays on the inside edge means that the zipper teeth are facing the wrong way.  it's not really noticeable when warm, so I didn't care.  It made it way easier to get on!


I also lengthen the coat as I found my previous version a bit short.  I can't remember by how much, but I think about 1.5 inches on this one.

I love little coats on babies eh?  Especially with adorable hoods!

Saturday, September 28, 2013

Selfish Sewing Week: Lemon Saltspring Dress!

I finished something!  For me!  It's kinda miraculous!


It's the new(ish) Saltspring Dress by Sewaholic Patterns.  I've been on the lookout for a go to knit dress.  One not too simple, but not too involved, and I think I might have found it in this dress!


It's a pattern for wovens or knits, but with a good knit you can omit the back zipper which I did and it's an easy fit, and super comfy dress!  And it hides those middle bits you might not like so much too!


I'm not convinced yellow is my colour, but I thought I'd try it, and it sure brightened up my fall!  And with a sweater and some boots I think this dress, despite it's rather summer friendly looks, can be an all season dress!  And well I even wear my summer dresses in the dead of winter with sweaters and tights so for me there are no seasonal limitations on sleeveless dresses!


Despite some issues with this fabric (I really think the triangles should be point up, but thats not the way it was printed)  The weight of it was perfect, and I actually cut this from 2 meters (probably aided by cutting a size 2 and having narrower back pieces without the zipper.)  And I think it's the perfect size.  I'm a size 2 up top, but a umm.. 6 or 8 at the waist (depeding on time of day)  But all I did was cut my elastic the length recommended for the size 6 and it worked fine!  I suppose the skirt is a teensy less full, but I like it!  I Also cut the bodice and skirt longer (the length of the largest size) to accommodate my long torso and long legs!  


And bonus (and one of the reasons I like this dress) it's nursing friendly.. just untie a strap!

Now off to hopefully finish my second project before I fall asleep or a baby wakes up!

Monday, September 23, 2013

Selfish Sewing Week Plans

I have big plans to sew my back to work wardrobe, so having Selfish Sewing Week happen now is perfect!

I have a pile of patterns and fabric I want to sew, but I'm hoping to make a dent on these three projects;


The Ginger skirt and the lisette shirt dress have been cut out forever!  And I just cut out the Saltspring last night.  

The Ginger is cut from some gorgeous Nani Iro brushed cotton I got from Fabrications, and the lisette fabric is from Carolyn Friedlander's Architextures collection.   The Saltspring from some generic knit I bought from an online store that shall not be named as I'm a bit disappointed with the (it wasn't clear what the direction of the triagles were and they are not the direction one would expect, and my three yards arrive in a 1 yard and 2 yard piece...  The site doesn't say fabric is continuous cut, but one would expect it to be...)  alas, I hope the yellow isn't too much for me, it's not my normal colour but I thought it was worth a shot!

Now to get the children to nap ;)

Friday, September 13, 2013

Toting Arrows

I haven't sewn myself something in awhile  Sure, I have like 17 dresses and 30 things cut out for the boys,  so it made perfect sense to buy a new pattern and make myself a bag instead or sewing any of those.


Actually, I kinda needed a bag to carry various crap (errr useful stuff) currently diaper/kids stuff, and eventually to take to work when I head back in 2.5 months.  So when I saw Noodlehead's Super Tote pattern back when she released it, I knew it would be perfect for both!    Sure I could have just downloaded the .pdf, but honestly, if I have the option, I like the tactile paper versions of things, so I contacted my friendly neighbourhood and awesome fabric shop Fabrications and asked if they could order it in.  One week later, it was in my hands.


I also picked up some of this awesome arrow fabric from Melody Miller's recent Ruby Star Polka Dot collection, as it just wanted to be on a bag!  I'm stockpiling some of it in a different colourway for a dress I think.  If I walk around wearing a dress and carrying this bag in the same design, that won't make me look weird right? hehe.


The lining is Boston (midtown) by Jay McCarroll (I love bricks!) with a splash of Echino dots for the interior pockets.   The gusset and straps are some twill from good ol' Fabricland. I had thought to use the dots on the gusset, but realized I wanted something more understated so to make the arrow design shine, hence the twill, which I think goes perfect!


Over all, it was a wonderful pattern to sew, no real issues, and I did a few things I hadn't really done before, including putting in a metallic snap (yikes it was easy!)  (I also fully lined the front pocket) and putting in the inset lining zipper, which again was way easier then any zipper I've put in clothing!   


I did add one little thing to the pattern, and that was to insert some D rings on little tabs between the lining and the exterior fabric at the sides.  This is in case I want to add in a longer carry strap to wear the bag across my body for longer walks!


And this bag holds a lot, but is not huge, I think it's kinda the perfect size, and I'm super happy with it.


Now, on to finish the 56 other things on my list!

Wednesday, July 31, 2013

The long awaited Negroni

I bought the Colette Negroni pattern to make up for the Mr. last year... or was it the year before? Regardless I'd had it for a while. I bought fabric in the fall, but didn't get around to cutting it till before Christmas... I had a baby... oops. I finally finished it as a late birthday present in like April... and now it's July! Time for me to post about it right? So here goes!

I'm not a fan of lengthy, complex patterns (I admit, I don't have tons of time, so I like quite, simple patterns mostly!), but while this one was more complex then I normally sew, the wonderful instructions typical of Colette Patterns took me through it!

And the Mr. was super excited about it.  I didn't use fancy fabric as it was my first go, it's almost a wearable muslin in some ways, but it's definitely wearable!  and I managed to make the plaid look ok too!

So I now present you with gratuitous pictures of my wonderful husband... I told him to act natural and not pose... this is what happened...


He's pretty happy with the fit, and so am I.  Ended up making a Large, but I had to take it out a bit through the ummm middle section ;)  I also cut long sleeves and then changed my mind which meant I had to do some not so fancy adjustments to the sleeves to make them look ok.  I still need to tack up the fold, but it works!

And he likes it!


Thursday, June 27, 2013

I'm still here! and l've made more hats!

Sorry to be so MIA lately my dear followers!  I don't know where the time has gone!  Ok I kinda do, and I blame my two kids :P  I haven't sewn too much, as I seem to only want to lay on the couch when I have free time these days haha.  

I'm hoping to get more back into it soon, and I have like 10 things cut out (thanks to my lovely Mother), I just need to get to sew them!

In the meantime, I give you two of the measly things I have sewn...   more to follow in upcoming posts (like in a few days or a week, not months, I swear!

Matching bucket hats for my two growing boys (little E is almost 7 months... and M is 3! whhhaaa??)... yay!  Using the awesome pattern from Oliver and S and the no handsewing shortcut from A Little Grey.

First an adorable sleepy picture :)


And another cute baby picture


I added ties to the wee ones as I often back carry him and need to make sure the hat stays on!  just tucked them into the seams at the two side seams, and voila.  Makes it non reversible, but thats ok!

And we can finish off with a pic of the unimpressed with my photo taking toddler in his hat.


And yes, I should have added interfacing, but I didn't, I kinda like the slight floppiness!  And I love this pattern!  so quick and awesome!  I just can't justify every buying hats!

Oh and I also made yet another bonnet, so I'll add a picture here, just cause!


Hooray for summer! 


Wednesday, March 6, 2013

Tiny Hats

Two former co-workers and friends of mine also had babies around the same time as little E, and so I wanted to make a little something for them that was all kinda matchy (lame but cute right?)

I had wanted to make E, a Snow Pixie Hat from Sew Liberated, so I decided to make three!


The other two babes are girls, so I picked girly colours for the binding, and a boyish green for E's.


They looks ridiculously cute on, but fit a bit small (E has outgrown his already despite the small size going up to 6 months, but then again he has inherited his Dad's giant head!)


They are pretty quick to whip up, I used organic bamboo fleece inside and a grey knit on the outside with different colour ribbing for the binding/ties.

I know winters nearly over, so hopefully they get some wear out of them yet!

Sunday, February 3, 2013

38 Weeks

Remember that maternity calendar shirt I made?  It's now gone mini!!


Just like the author of the tutorial I made the shirt from did, I hacked mine up into a little romper for E!  I wasn't ever going to wear the thing anyways, and this way he can get some use out of it, and it'll be a nice keepsake for us (imagine me bringing it out at his wedding? or passing it down to a grand-baby some day?) eek!

This shirt was of particular significance as I had really wanted to make it to 37 weeks with this baby, having had my older son early, and wanting to avoid the extra potential complications/interventions that can lead to and wanting to birth at home (which Midwives here can only let you do after 37 weeks).  I particularly wanted to get to 38 weeks, as that would make things like jaundice even less likely.  And I made it to 38 weeks and 1 day!  And all that work produced one super cute baby (who's now already almost 2 months!)


I used this tutorial to make the romper, pretty straightforward stuff (despite it being in Dutch!)  While I did get my Dutch mother to read it through I didn't really need her too, the pictures and a few quick checks on words with Google Translate were enough.  The only thing it neglects to tell you is seam allowances, but I figure it was meant to be served, so I assumed 1/4 inch.

It came together super quick too, partially thanks again to my lovely new machine!  Hand sewing on the snaps probably took the longest... I really should get snaps to use with the snap press I have lying around!  I had to cut it on an angle to make sure the 38 week number appeared, but it worked!  And he looks darn cute in it.

Monday, January 21, 2013

Girly and purple

I don't often get to make little girl clothes, being the mother of two boys and all.  Thankfully little M has some adorable girl friends who I can make things for.


And one of them just turned three, and loves purple.  Seriously, everything she wears pretty well must have purple in it.  So since last year I made her this purple backpack, I thought I'd use this chance to make a top!  I had some of the polkadots left from my Kobo cover, and a fat quarter of this floral which I thought would be perfect!  And I had just enough, although the skirt of the shirt is in two pieces.


The pattern is one of the many cute patterns coming out of the Peek-a-boo pattern shop, the Hopscotch top, tunic and dress. And it provided the first opportunity for me to make button holes with my new machine, and they were a success!  Now I'm not so scared to tackle some other waiting projects with lots of buttons!
Related Posts Plugin for WordPress, Blogger...